Program Options
General
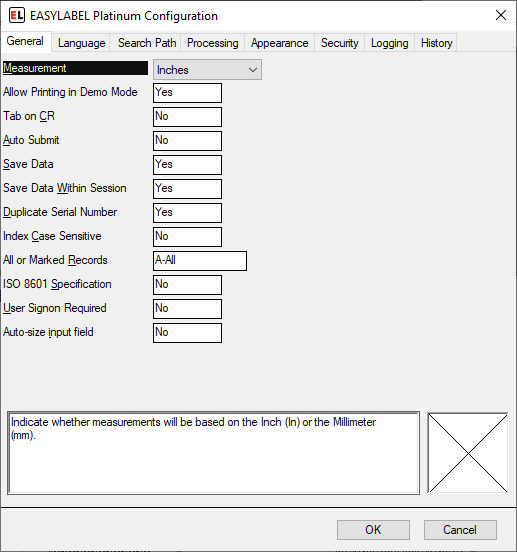
Measurement
Set whether measurements will be based on inches or millimeters.
Allow Printing in Demo Mode
Select Yes to allow printing in demo mode and No to disable. Attempting to print with this disabled will result in an error. This can be used to prevent printing when a license is missing.
Tab on CR
This applies when inputting variable data when printing a format. If No then a carriage return or Enter key will “click” the ok button on the dialog. If Yes then it will either move input to the next prompt or “click” the ok button if all prompts are filled.
Auto Submit
This option only applies when printing formats with user entered variable data. If Yes then the job request dialog is immediately shown after entering variable data. If a job is submitted then the variable data dialog is shown again allowing new data to be entered. If No then the job request dialog may not be shown after entering variable data and no dialog will be shown after a job is submitted.
Save Data
Select Yes to have the last previously entered variable data for when printed fields to be remembered for the next printing session.
Save Data Within Session
Select Yes to have the last previously entered variable data for when printed fields to be remembered within the current printing session.
Duplicate Serial Number
Select Yes to allow printing duplicate labels in a batch using the same serial file value. Select No to disallow printing duplicate labels in a batch with the same serial file value.
Index Case Sensitive Database Searches
Select Yes to make internal database index searches case sensitive (the same lower and upper case character are not equal). Select No to make index searches case insensitive (the same lower and upper case characters are considered equal)
All or Marked Records
Sets the default database selection in the print request screen when printing a group of records. Select All Records to print all the records in the database. Select Marked Records to print a series of previously chosen records.
ISO Week of the Year
Select Yes to calculate the week of the year according to the ISO 8601 standard.
User Sign on Required
Select ‘Yes” to require user identification and password to be entered when the program is started.
Auto-size input field
Selecting this option will automatically resize input boxes as text is entered. This applies to When Printed fields at print time.
Language
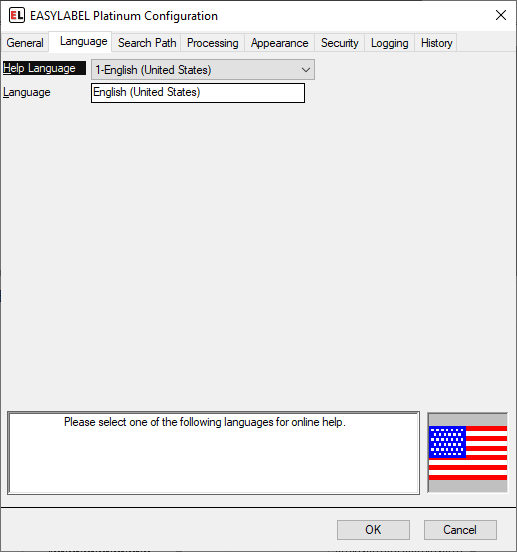
Help Language
Choose the language that you wish to display the help system in.
Language
Choose the language that you wish the application to display in.
Search Path
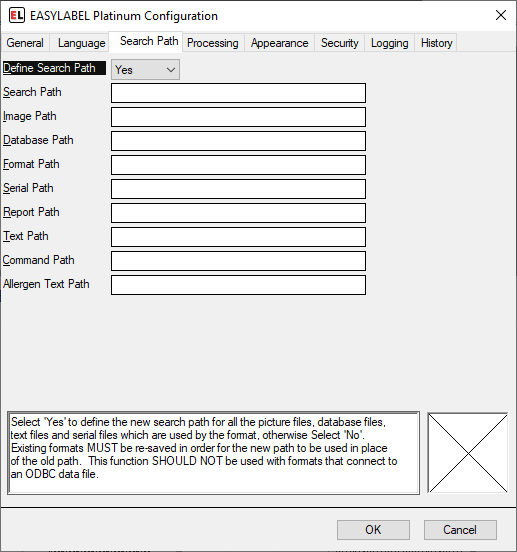
Define Search Path
Select ‘Yes’ to define the search path for all picture files, database files, text files, and serial files which are used by the format.
NOTE: Existing formats MUST be re-saved in order for the new path to be used in place of the old path.
Search Path
Enter the path to the files in the corresponding text box or browse to location by selecting the ‘Browse’ button.
NOTE: Existing formats MUST be re-saved in order for the new path to be used in place of the old path.
Default Paths
Default paths can be set for all of the file types. Enter one or more directory or folder names separated by ‘;’to be searched when a file cannot be found in the location stored in the label format. The paths for each file type are searched in the order that they are entered.
Image Path: Default Path(s) for Images
Database Path: Default Path(s) for Database files
Format Path: Default Path(s) for Formats
Serial Path: Default Path(s) for Serial files
Report Path: Default Path(s) for Reports
Text Path: Default Path(s) for Text files
Command Path: Default Path(s) for Command files
Allergen Text Path: Default Path(s) for Command files
NOTE: Default Paths are Program options. The Paths are NOT stored in the label format when the label is saved.
Processing
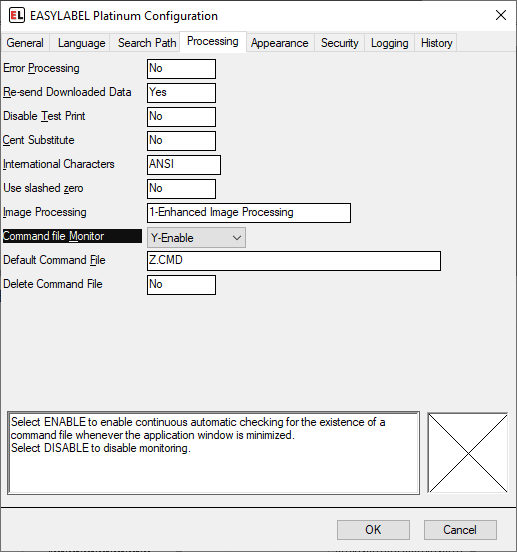
Error Processing
This option affects the processing of command files when a database record cannot be found. Select Yes if you want database field values set to 0 and the label printed. Select No if you want to stop printing when a record cannot be found in the database.
Re-send Downloaded Data
Select Yes to re-send all downloaded data (graphics, fonts, etc.) at the beginning of each job, otherwise select No.
Disable Test Print
Select Yes to disable test print from the print screen. It will still be available while editing a format.
Cent Substitute
Select Yes to print the tilde (~) as a cent symbol (¢).
International Characters
Select ANSI if Text Files (command, data, etc.) are created under Windows using ANSI characters. Select OEM if created under DOS.
Use Slashed Zero
Select No to use Unslashed zero. Select Yes to use Slashed zero (if available)
Image Processing
Indicate the type of processing to be used. Enhanced Image Processing will allow you to open many more types of images. To display and print in color, you must use Enhanced Image Processing.
Command File Monitor
Select Yes to enable continuous automatic checking for the existence of a command file whenever the application window is minimized. Select No to disable monitoring.
Default Command File
When command file monitoring is selected, enter the path/name of the command file to monitor.
Delete Command File
Select Yes to delete the default command file after processing. This is useful when an external program needs to know that the command file has been processed. Select No to retain the default command file after processing. Command files that are processed by “drag-and-drop” onto the EASYLABEL window are NEVER deleted, regardless of the setting of the “Delete Command File” program option.
Appearance
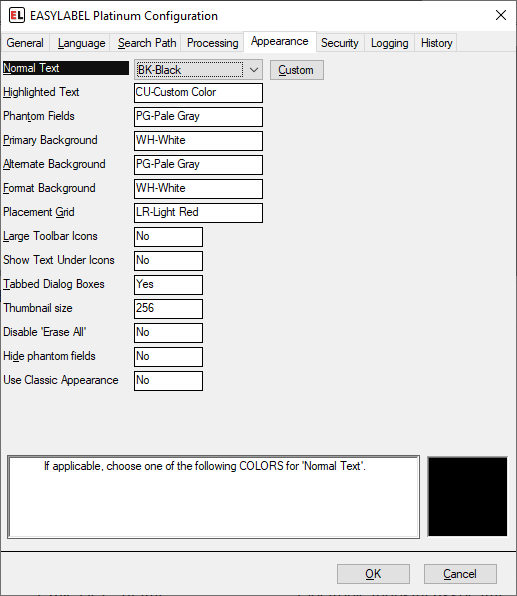
Normal Text
Select the predefined color or create your own color, by selecting the ‘Custom’ button, for all Normal Text
Highlighted Text
Select the predefined color or create your own color, by selecting the ‘Custom’ button, for all Highlighted Text
Phantom Fields
Select the predefined color or create your own color, by selecting the ‘Custom’ button, for all Phantom Fields.
Primary Background
Select the predefined color or create your own color, by selecting the ‘Custom’ button, for the Primary Background.
Alternate Background
Select the predefined color or create your own color, by selecting the ‘Custom’ button, for the Alternate Background.
Format Background
Select the predefined color or create your own color, by selecting the ‘Custom’ button, for the Format Background.
Placement Grid
Select the predefined color or create your own color, by selecting the ‘Custom’ button, for the Placement Grid.
Large Toolbar Icons
Select Yes to show large icons in all of the toolbars. Select No to show the standard size (small) icons. This does not affect icons in the ribbon.
Show Text Under Icons
Select Yes to show a text hint under icons in the toolbar. This does not affect icons in the ribbon.
Tabbed Dialog Boxes
Select Yes to show dialog boxes in standard tabbed format where items are grouped by function. Select No to use single page dialog boxes where all items are presented in a single list.
Thumbnail Size
Select the size of the thumbnail image used in the Format Browser. Enter a custom size or choose a default size from the dropdown.
Disable ‘Erase All’
Select Yes to disable the “Erase All Records” button in EASYLABEL’s non-SQL Database Editor, otherwise select No to keep this button active.
Hide Phantom Fields
Set this option to Yes to keep phantom fields from being displayed on the print preview screen.
Use Classic Appearance
Select Yes to use the classic appearance used by previous versions of EASYLABEL. This will use the classic toolbars instead of the ribbon. Some features may be missing from the classic appearance. The classic appearance may not receive updates and may be removed in future releases.
Security
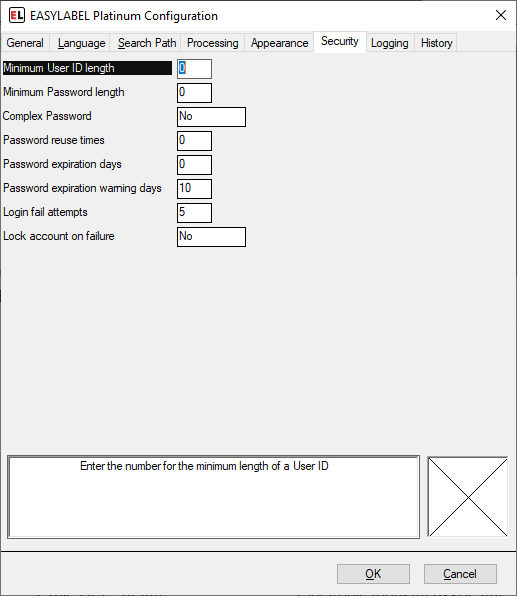
Minimum User ID Length
Enter the number of characters to be used as the minimum length for a User ID. The Software will not allow a user to be added unless the length of the User ID is equal to or greater than this number. Leaving this option set to ‘0’ means there is no Minimum User ID Length.
Minimum Password Length
Enter the number of characters to be used as the minimum length for a Password. The Software will not accept password unless the length of the password is equal to or greater than this number. Leaving this option set to ‘0’ means there is no Minimum Password Length.
Complex Password*
Select ‘Yes’ to force passwords to contain at least one numeric (0-9) or special (!@#$% etc.) character. Select ‘No’ to allow simple passwords composed of letters only.
Password Reuse Times
Enter the number which defines the password reuse policy. The number entered here will be the number of passwords the software ‘remembers’. The software will not allow a user to re-use one of these passwords. Leaving this option set to ‘0’ means no passwords are remembered and the user would be able to keep using the same password. For example: entering a 3 here will prohibit users from re-using their 3 last used passwords.
Password Expiration Days
Enter the number of days after which the password will expire. The next time the user logs on with the old password, they will be prompted to enter a new password before being able to use the software.
Password expiration warning days
Enter the number of days before the password expiration for which a warning message will be shown. This acts as a reminder that the password will expire.
Login fail attempts
Enter the maximum number of times a login failure can occur.
Lock account on failure
Set to Yes to lock the account if the limit set by the “Login fail attempts” option is reached.
Logging
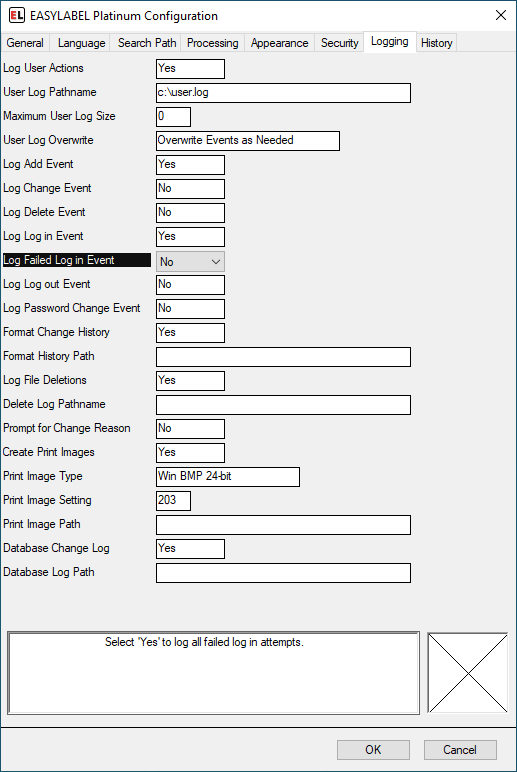
NOTE: The Logging options here are provided for Legacy Support. It is recommended that new users who want to log events and changes use the features on the History tab instead.
Log User Actions
Selecting ‘Yes’ enables logging of user actions, such as changes to the user configuration or users logging in or out of the program.
User Log Pathname
Enter or browse to the path where you would like the user logs stored. This path should also include the name of the log file. The User Log that is created is an encrypted file and the Log Reader must be used to view its contents.
Maximum User Log Size
Enter the size limit of the user log file, in Kilobyte (1000 byte) increments. For example, enter 2000 to set the maximum log size to 2MB (2 megabytes). The log file will then grow up to 2MB in size. A value of 0 means that the size of the log file is not limited.
User Log Overwrite
Select an option for processing user events in the case of the user log reaching its maximum size. Overwrite Events as Needed means to replace the oldest events with the newest events. Do Not Overwrite Events means none of the events will be overwritten.
NOTE: The Do Not Overwrite Events value causes the Maximum User Log Size option to be ignored. The User Log file will keep getting larger.
Log Add Event
Select ‘Yes’ to log the addition of a new user.
Log Change Event
Select ‘Yes’ to log any changes that are made to a user.
Log Delete Event
Select ‘Yes’ to log the deletion of a user.
Log Login Event
Select ‘Yes’ to log all successful user logins.
Log Failed Login Event
Select ‘Yes’ to log all failed login attempts.
Log Logout Event
Select ‘Yes’ to log all program shutdown (logout) events.
Log Password Change Event
Select ‘Yes’ to log all times the user changed their password.
Format Change History
Select ‘Yes’ to keep a history of all changes made to label format files. This will create a backup format file anytime a format is saved if its “Save Backup Format” option is enabled.
Format History Path
Enter the path of the directory where the label format backup files will be stored. Leave this option blank to store backup files in the same directory as the label format file.
Log File Deletions
Select ‘Yes’ to log all times a file was deleted through File | Erase on the menu bar.
Delete Log Pathname
Enter or browse to the path where you would like the delete logs stored. This path should also include the name of the log file.
Prompt for Change Reason
Select ‘Yes’ to require users to enter text describing the reason for changing a label format. This text is displayed when opening the format.
Create Print Images
Selecting ‘Yes’ will create an image file of each print job for any format that has “Save Print Image” option enabled.
Print Image Type
Choose the file format of the print image.
Print Image Setting
Choose the dpi to use for the print image.
Print Image Path
Enter the path of the directory where the format print image files are to be stored.
Database Change Log
Select ‘Yes’ to create a log of changes made to .MDB databases. This log is only updated when using the supplied database editor. A different editor (Microsoft Access for example) will not log the changes.
NOTE: If database logging is turned on and the database structure is changed, the old log is saved and a new log is created. This can cause a lot of log files to be created if you frequently change the database structure.
Database Log Path
Enter the path where the database change logs should be written.
History
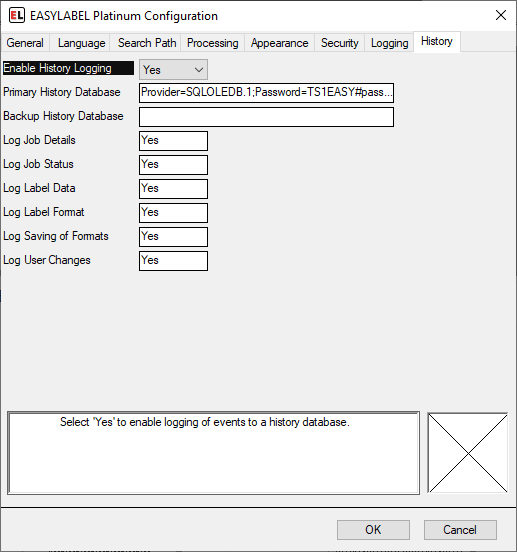
EASYLABEL features an extensive reporting, logging and label reprint application called the Print History Console. The Print History Console provides a central location for your EASYLABEL reports and logs. Multiple copies of EASYLABEL can connect to one Print History Database allowing for centralized logging and reporting.
NOTE: The Print History Console must be installed before data can be logged. Information for setting up the print history console can be found in the Documents folder in the directory that EASYLABEL was installed into. For information on setting up print history using sql view the EASYLABEL_Print_History_SQL.pdf file in the Documents directory. For information on setting up print history using Access view the EASYLABEL_Print_History_MDB.pdf file in the Documents directory.
Enable History Logging
If this option is set to “No” then no history is logged. Nothing will be written to the selected SQL database. Set this option to “Yes” to enable history logging. Then use the following options to control the types of history you want to be logged.
Primary History Database
Enter a connection string that points to the database containing the EASYLABEL history tables. If the Primary History Database is unavailable (because of server outage or network errors) then EASYLABEL will log history to the backup history database if one is defined. Use the “Prompt” button to bring up the database connection dialog. Follow the database connection dialog to select a database server, database name, and user name and password. Test the connection to make sure all of the information is correct.
NOTE: To make future connections easier, so that you do not have to reenter the password, select the “Allow saving password” option.
Backup History Database
Enter a connection string that points to a secondary database containing the EASYLABEL history tables. If a Backup History Database is defined then EASYLABEL will log history data here when the Primary History Database is not available. If the primary database is on a network server it may make sense to have the backup database local on the computer running EASYLABEL.
NOTE: The backup database must be an sql database. It cannot be an Access database. No backup database is available if the primary database is an Access database.
Log Job Details
Set this option to “Yes” to log the information for all print jobs. This includes information such as: format name, date, time, user name, computer name, etc. This option is required before setting other print job logging options.
Log Job Status
Set this option to “Yes” to log the status updates for print jobs. This will log when the job is queued, when printing is started and ended, and any errors that may occur during the printing process.
Log Label Data
Set this option to “Yes” to log the label data for every printed batch of every print job. When this is used in conjunction with the “Log Label Format” option, it is possible to view and reprint any batch of any print job.
Log Label Format
Set this option to “Yes” to save a copy of the label format file for each print job. This will allow the Print History Console to display an image for a printed label. The label format file can also be recovered if the original version is accidentally lost.
Log Saving of Formats
Set this option to “Yes” to log information about every save of a label format file. This allows for viewing the history of all changes to the label format.
Log User Changes
Set this option to “Yes” to log changes to EASYLABEL user profiles, such as the user description, access rights, etc.
